Easy PostgreSQL 10 and pgAdmin 4 Setup with Docker
Jonathan S. Katz
10 min readMore by this author
UPDATE: Want to learn how to use pgAdmin 4 with PostgreSQL 12? Then check out Easy PostgreSQL 12 and pgAdmin 4 Setup with Docker!
The open source software ecosystem around PostgreSQL is as robust as the database itself, but sometimes it can be hard for people new to PostgreSQL, and even some seasoned veterans, to get all of the software dependencies for their development environment setup on their computers.
At Crunchy Data, we obsess on making things as easy as possible for people to get software up and running, regardless of the technology. While I was trying to find things to experiment with using Docker, one of our engineers gave me a recipe to setup PostgreSQL 10 and pgAdmin 4 easily and quickly. It was so simple, I thought it would be fun to share it!
While going through this process, I was also learning how to better use Docker, so I wrote a detailed guide explaining each part of the process to help shed some light on how to work with Docker and PostgreSQL. However, if you just want to get up and running, the tl;dr guide is just below.
tl;dr: Quick setup for PostgreSQL 10 & pgAdmin 4
1. Run the following commands in your terminal
Alternatively, you can download this script.
2. Do the following in your web browser
- Go to http://localhost:5050/
- Log into pgAdmin 4 with
- Email: youremail@yourdomain.com
- Password: yoursecurepassword
- Add a server using:
- Hostname: postgres
- Username: yourusername
- Password: yourpassword
The Detailed guide
Part 1: Download Docker
In order for this recipe to work, you need to be using Docker. If you are unfamiliar, Docker is an open source containerization platform, which allows developers to create and run isolated instances of applications with all of their dependencies. Docker provides a nice explanation of what containers and how they work here.
You can download Docker from the URL below, or use your favorite package manager to install Docker onto your system:
https://www.docker.com/community-edition#/download
Part 2: Install PostgreSQL 10
Now it's time to install PostgreSQL 10. There are a few things we need to do before we can get PostgreSQL up and running. First, we need to get an image of PostgreSQL in order to run a container.
A Docker image is basically a snapshot of the filesystem of the application you want to run. Some docker images allow you to pass in variables in order to configure settings dynamically, which is useful if you want to deploy your containers across multiple systems. For example, you may want to create several docker containers that require different PostgreSQL usernames and passwords to access each database.
We will be using the "crunchy-postgres" image, which uses the community version of PostgreSQL and passes in several helpful parameters to help you optimize how you run your database.
2.1: Setup your workspace
Let's create a directory on your computer to work from. For example, this is what I did on my computer:
mkdir postgres
cd postgres
Now, we need to create a folder to store the data for our PostgreSQL instance. By default, Docker containers do not persist data beyond the lifecycle of a container, so we will need to specify a "volume" to save our data to our disk. We will create one volume for our PostgreSQL 10 environment:
docker volume create --driver local --name=pgvolume
2.2: Setup your environment
As mentioned mentioned earlier, we need to pass in some settings to properly configure our Docker container to run PostgreSQL. Using your favorite text editor, create a file in the postgres directory called called pg-env.list and add the following:
PG_MODE=primary
PG_PRIMARY_USER=postgres
PG_PRIMARY_PASSWORD=yoursecurepassword
PG_DATABASE=testdb
PG_USER=yourusername
PG_PASSWORD=yoursecurepassword
PG_ROOT_PASSWORD=yoursecurepassword
PG_PRIMARY_PORT=5432
What do all of these settings do?
| Setting | Description |
|---|---|
| PG_MODE | A parameter just for crunchy-postgres that determines how to setup this PostgreSQL instance. Other options include "replica" for creating a read-only instance, as well as "set" for creating a StatefulSet in a Kubernetes cluster |
| PG_PRIMARY_USER | Sets the username of the superuser for your database instance. |
| PG_PRIMARY_PASSWORD | The password for the PG_PRIMARY_USER in your database instance. |
| PG_DATABASE | The name of the default database to create in the database instance. |
| PG_USER | The username of the default user in the database instance. This user will have access to PG_DATABASE |
| PG_PASSWORD | The password for PG_USER |
| PG_ROOT_PASSWORD | The password for the "postgres" user in your database instance, which is the root user. |
| PG_PRIMARY_PORT | The database port that PostgreSQL will run on. The default PostgreSQL port is 5432. |
2.3 Setup your network
Docker has three default networking options:
- bridge - the default network for a container, it represents a virtual, isolated network for you containers
- host - the network on your computer; any container on this network is potentially visible to the Internet
- none - no network is assigned to a container
We will need for our PostgreSQL 10 container to be able to communicate with your pgAdmin 4 container, so the default bridge network sounds ideal for our these purposes. However, by default, the Docker bridge network does not support automatically discovering other containers on the network.
In order to make our setup easier, we are going to create a user-defined bridge network called "pgnetwork" that will connect our PostgreSQL 10 and pgAdmin 4 containers:
docker network create --driver bridge pgnetwork
2.4 Run PostgreSQL 10
Now we can run PostgreSQL 10! To do so, run the following command from you "postgres" directory:
docker run --publish 5432:5432 \
 --volume=pgvolume:/pgdata \
 --env-file=pg-env.list \
 --name=postgres \
 --hostname=postgres \
 --network=pgnetwork \
 --detach \
crunchydata/crunchy-postgres:centos7-10.9-2.4.1
If this is your first time installing the crunchy-postgres container, you may need to wait a few moments for all the files to download.
What do each of these parameters do?
| Parameter | Description |
|---|---|
| --publish | Exposes a container's port to the host machine. Our configuration set PostgreSQL to run on port 5432, and this command maps it to the local machine's port 5432. If you're already running PostgreSQL on your local machine, you could map your container's port to 5433 by using -p 5433:5432 |
| --volume | Mounts a volume to the container. This also specifies the directory from the image to persist, which in this case is /pgdata |
| --env-file | A file to load the environmental variables from, used to help create and configure the container |
| --name | The name of the container. This makes it easy to manage, e.g. docker restart postgres |
| --hostname | The hostname of the container. |
| --network | Attach the container to a network, in this case, the pgnetwork that we created. |
| --detach | Run the container in the background. |
Your container with PostgreSQL 10 should now be running! You can check on its status with the following command that looks for all containers named "postgres:"
docker ps -f name=postgres
Part 3: Install pgAdmin 4
Now we are ready to install pgAdmin 4. Before continuing, please be sure that you setup your network called "pgnetwork" as described above, as this is necessary to ensure your pgAdmin 4 container can discover your PostgreSQL 10 container.
3.1 Setup your workspace
Similar to setting up our PostgreSQL 10 container, we will need to create a volume in order to persist data from pgAdmin 4. We can do so with this command:
docker volume create --driver local --name=pga4volume
We are purposely creating a new volume for pgAdmin 4 in order to keep the data separated from your PostgreSQL 10 volume. Why? You may want to run multiple PostgreSQL instances on your machine that you may frequently create and destroy, so separating your volumes prevents you from deleting your pgAdmin 4 metadata.
3.2 Setup your environment
Let's setup the environment for pgAdmin 4. In your postgres directory, create a file named pgadmin-env.list and add the following configuration:
PGADMIN_SETUP_EMAIL=youremail@yourdomain.com
PGADMIN_SETUP_PASSWORD=yoursecurepassword
SERVER_PORT=5050
What do each of these variables do?
| Variable | Description |
|---|---|
| PGADMIN_SETUP_EMAIL | The email address used to log into pgAdmin 4 |
| PGADMIN_SETUP_PASSWORD | The password used to log into pgAdmin 4 |
| SERVER_PORT | The port to run pgAdmin 4 on. |
3.3 Install pgAdmin 4
Now we can run pgAdmin 4! We will by using the crunchy-pgadmin4 image which is just the page pgAdmin 4 code wrapped with container configuration scripts. The following command will install pgAdmin 4 with your specified configuration, and will also download crunchy-pgadmin4 if this is the first time your are installing it:
docker run --publish 5050:5050 \
 --volume=pga4volume:/var/lib/pgadmin \
 --env-file=pgadmin-env.list \
 --name=pgadmin4 \
 --hostname=pgadmin4 \
 --network=pgnetwork \
 --detach \
 crunchydata/crunchy-pgadmin4:centos7-10.9-2.4.1
Like with installing the crunchy-postgres container, if this is your first time installing crunchy-pgadmin4, it may take you a few moments to download.
3.4 Configure pgAdmin 4
We are almost at the finish line! We just need to connect your pgAdmin 4 instance to your PostgreSQL 10 database.
Open your favorite web browser and navigate to http://localhost:5050. You will be created with a login page. Enter in the email address and password that you setup in your configuration file:
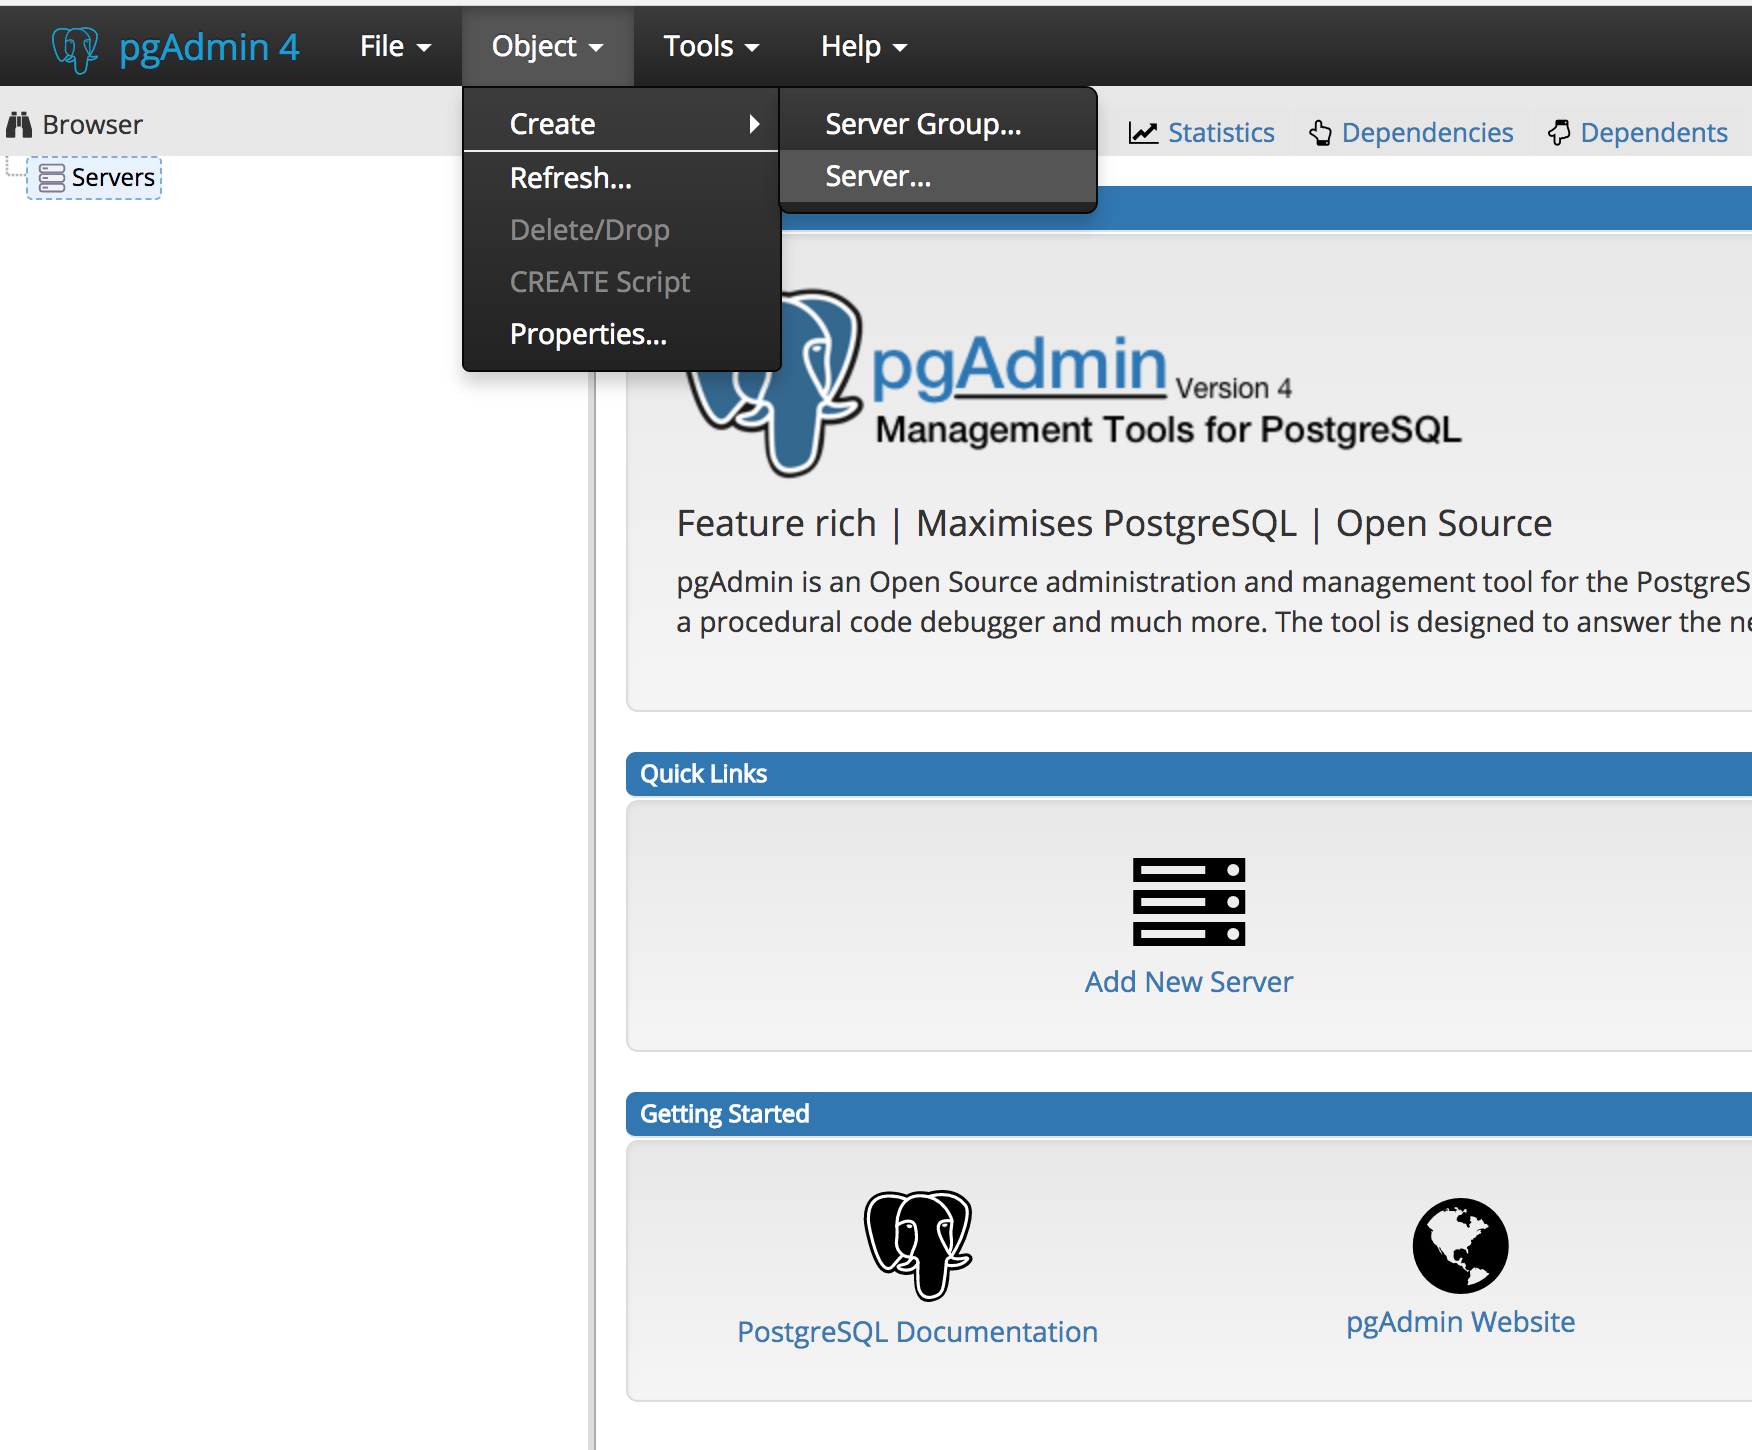
 After logging in, you will be brought to the dashboard of pgAdmin 4. From here, you will want to add a new server in order to connect to your PostgreSQL 10 instance. You can create a new server from the "Object" menu by navigating to the "Create" submenu and finding "Server...," or by clicking "Add New Server" in the "Quick Links" section of the dashboard:
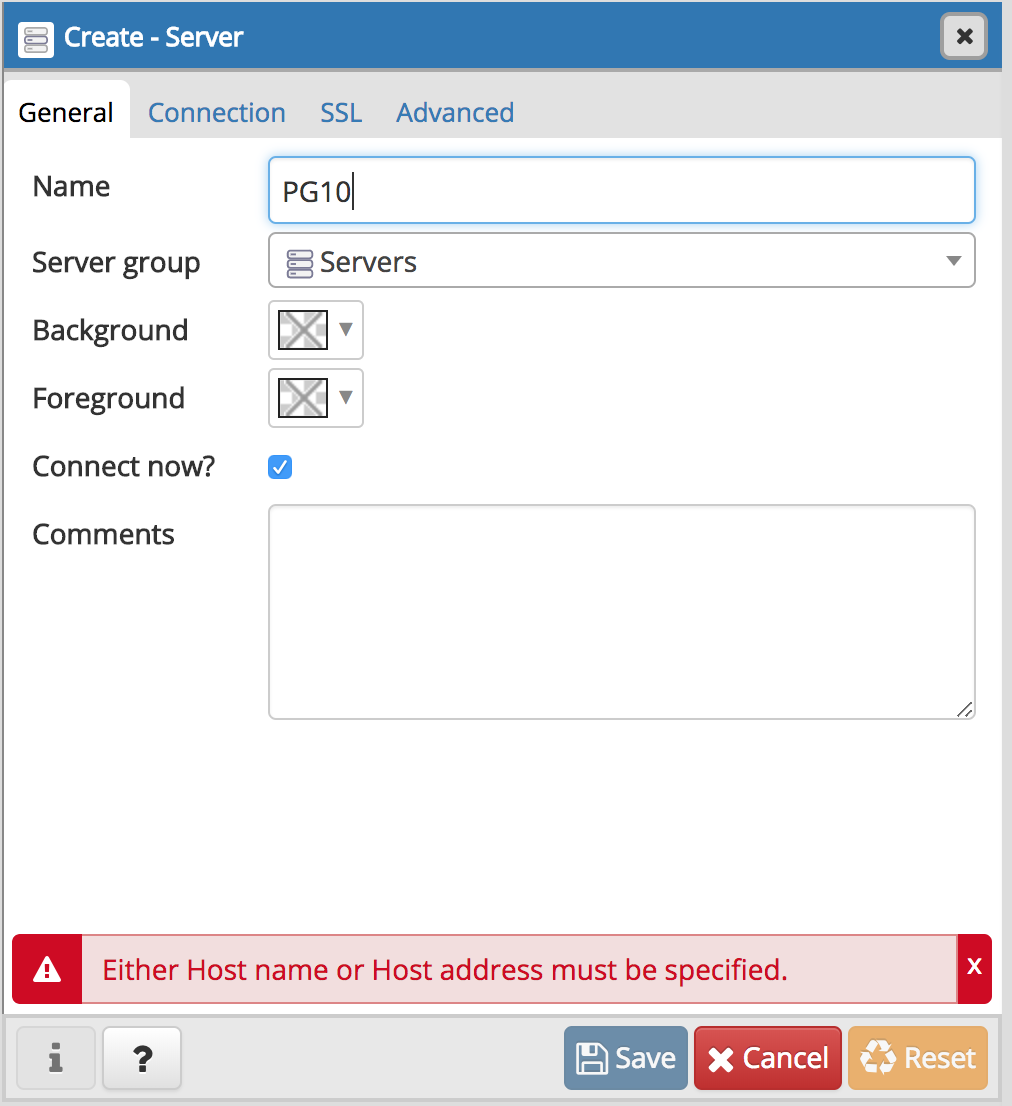
 A window should popup asking you to enter more information. In the "General" tab, give your server a name, such as "PG10." A warning might pop up asking you to add additional information, but don't worry, we will handle that in the next step:
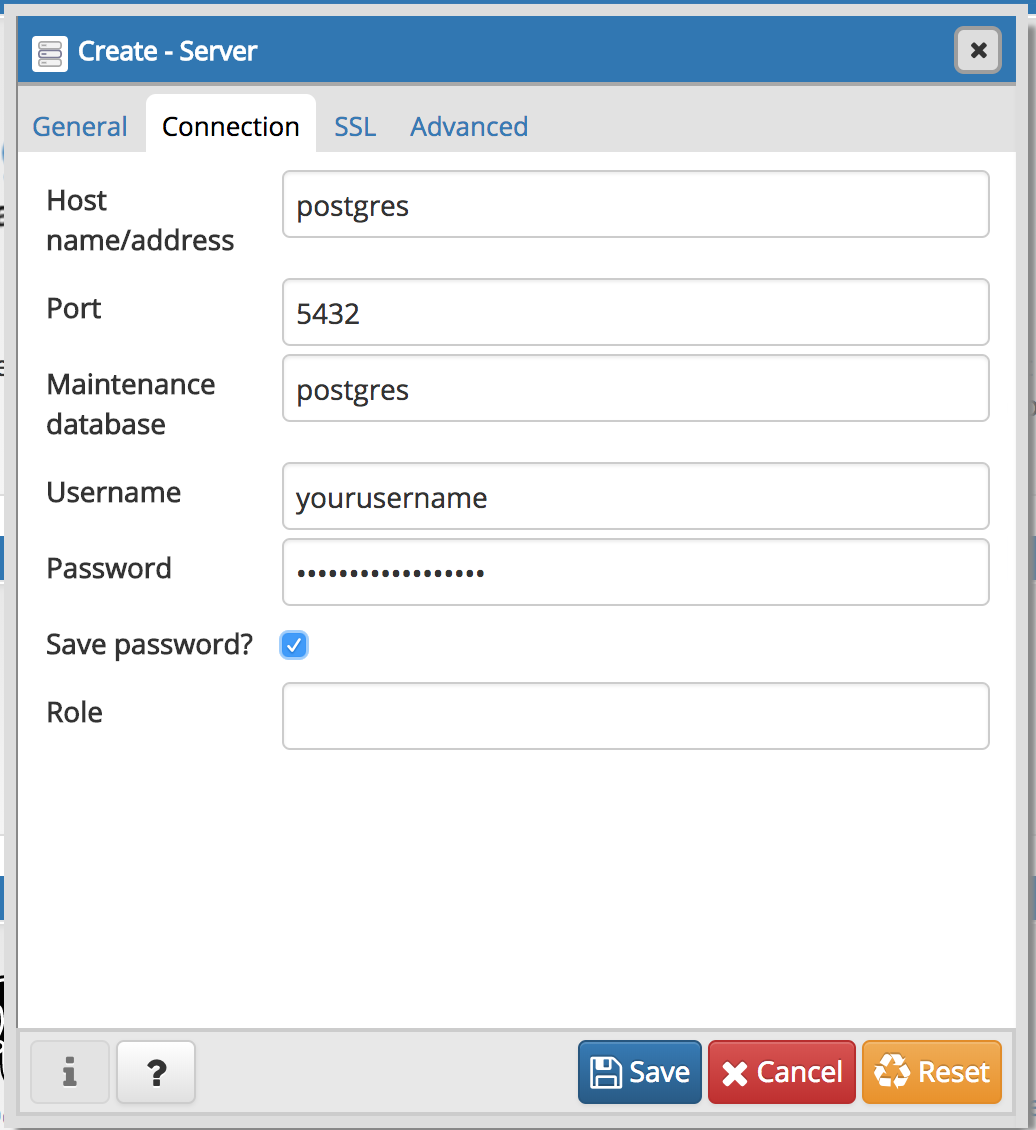
 Click the "Connection" tab. This is where setting up the Docker networking configuration will pay off! For your hostname / address, all you have to do is type in "postgres" - the Docker network's auto-discovery feature will correctly map the hostname to IP address for you! Continue filling out the form with the PostgreSQL username and password you setup when creating your PostgreSQL 10 instance:
 When you are finished, click "Save."
After a brief moment, your PostgreSQL 10 database should appear. Have a look around!
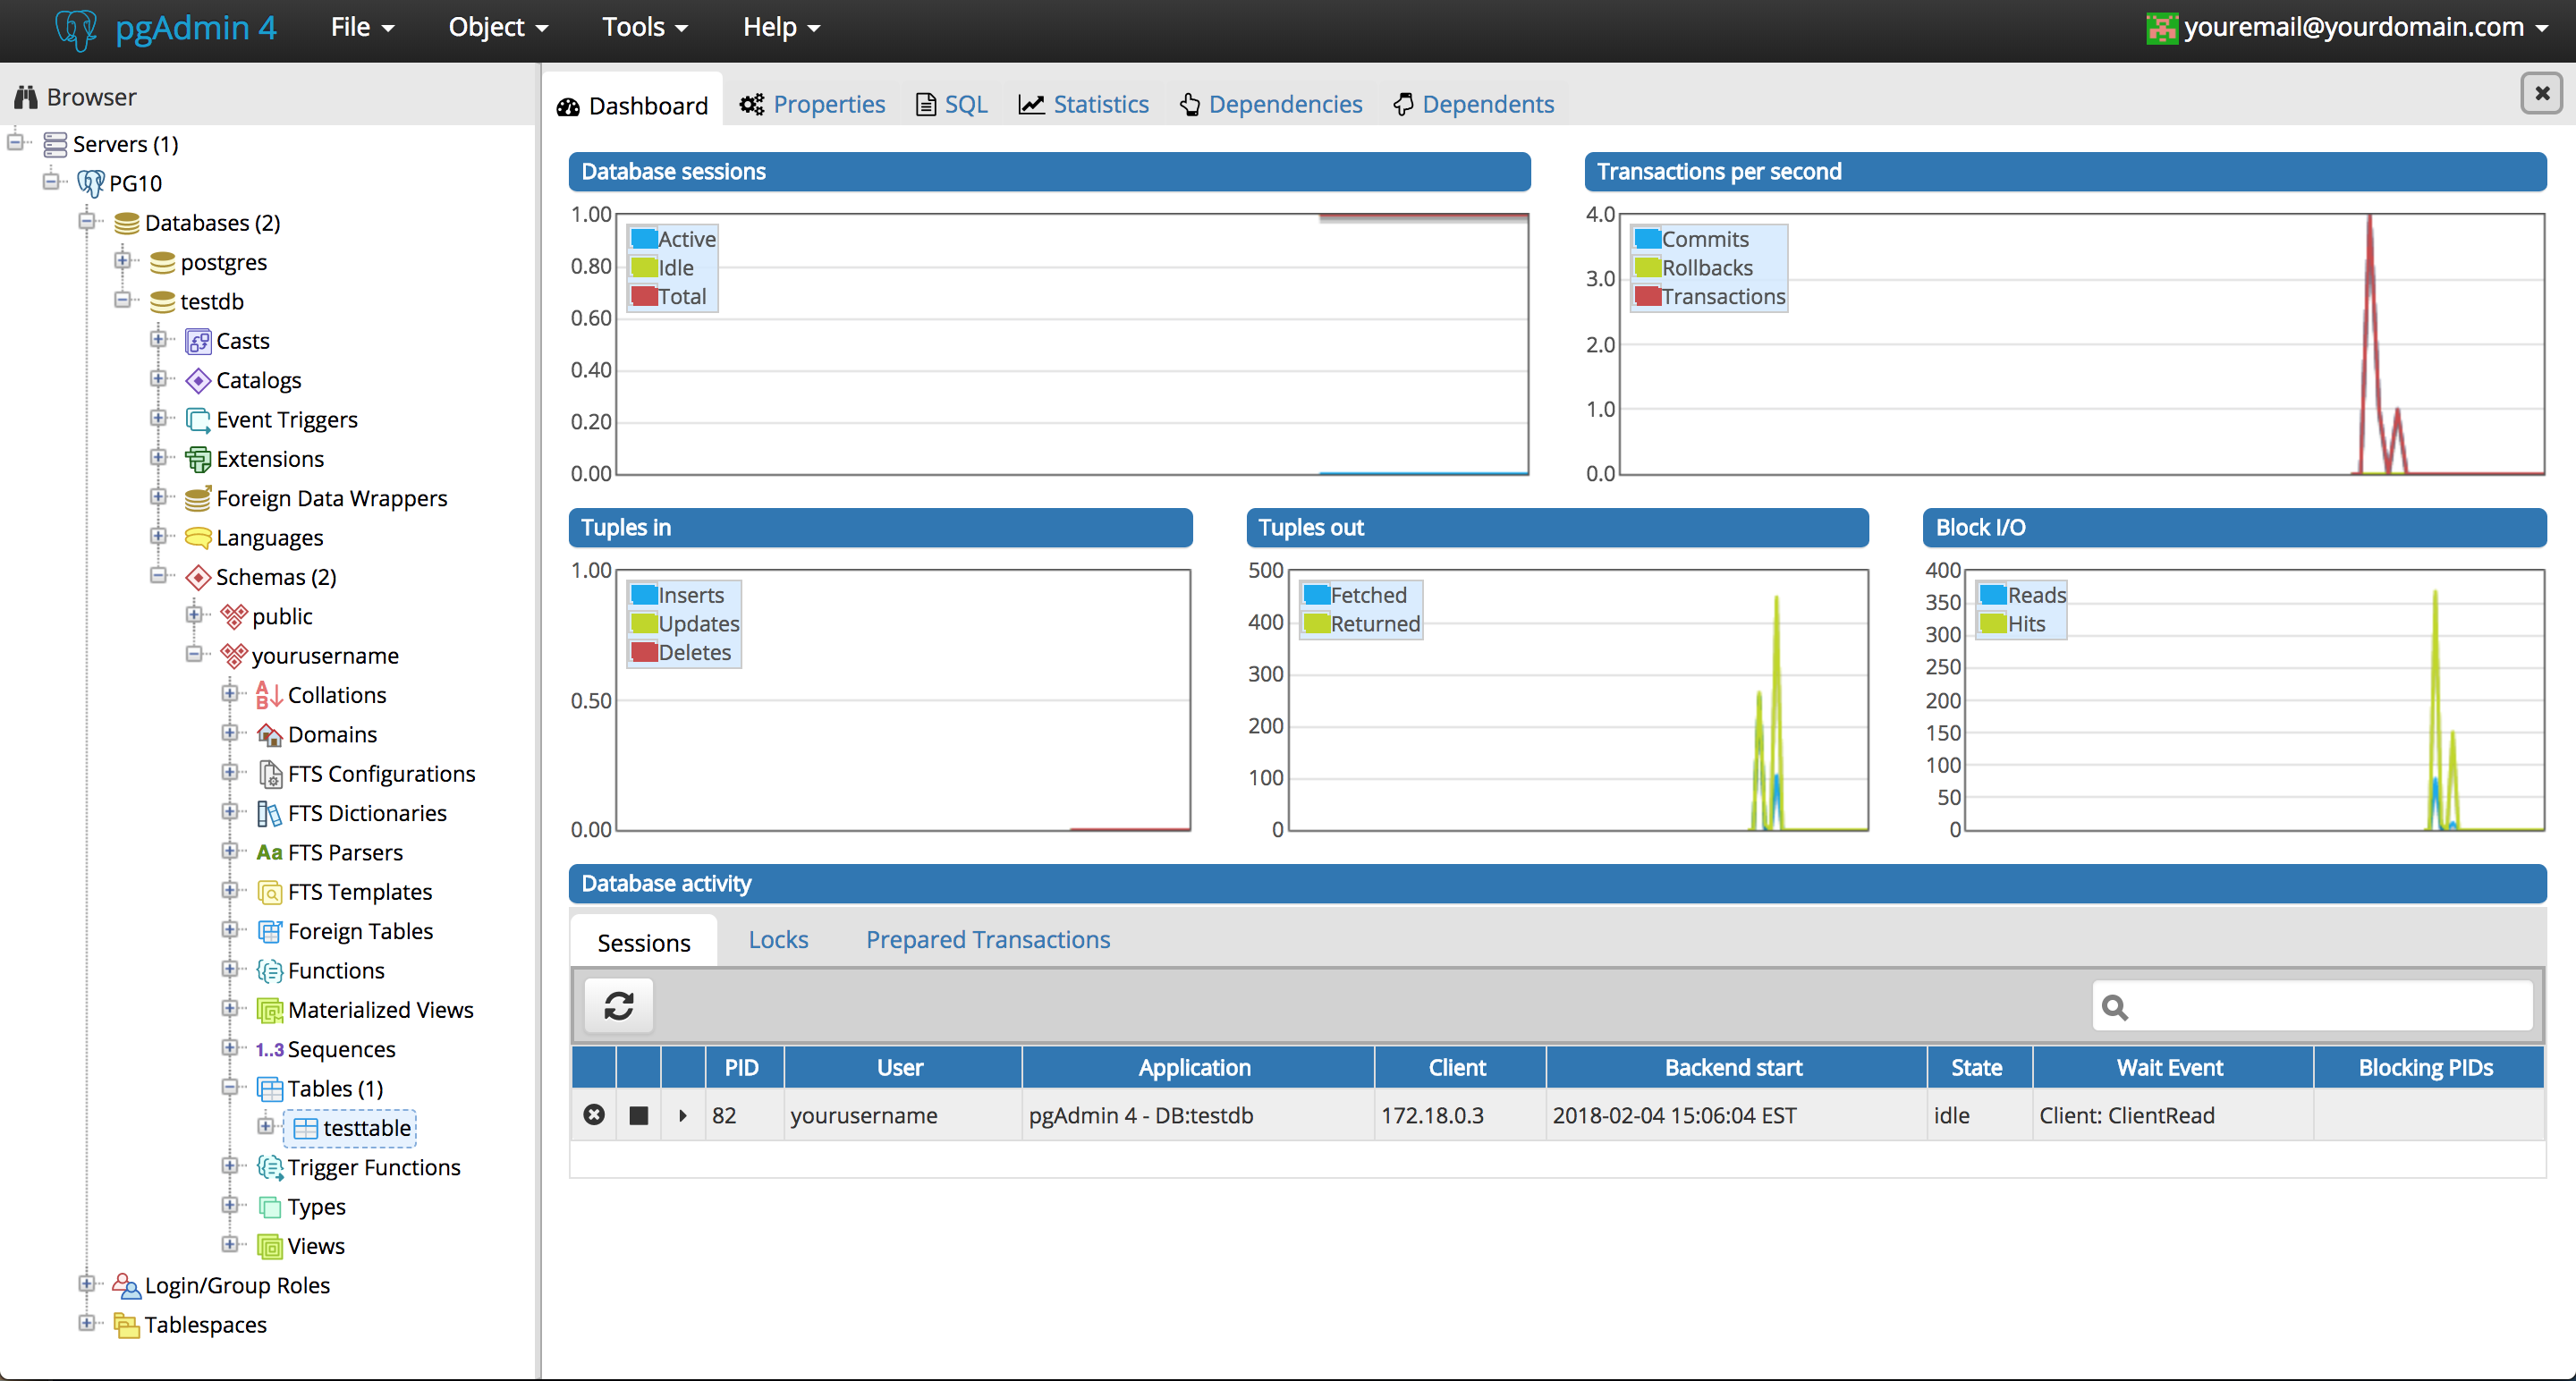 The crunchy-postgres image creates and populates a table for you, so as a final test, let's make sure that data is present. Click on "testdb" in the left-hand navigation and then click on "Tools" in the top navigation. Select "Query Tool" and a tab that allows you to query the database should open.
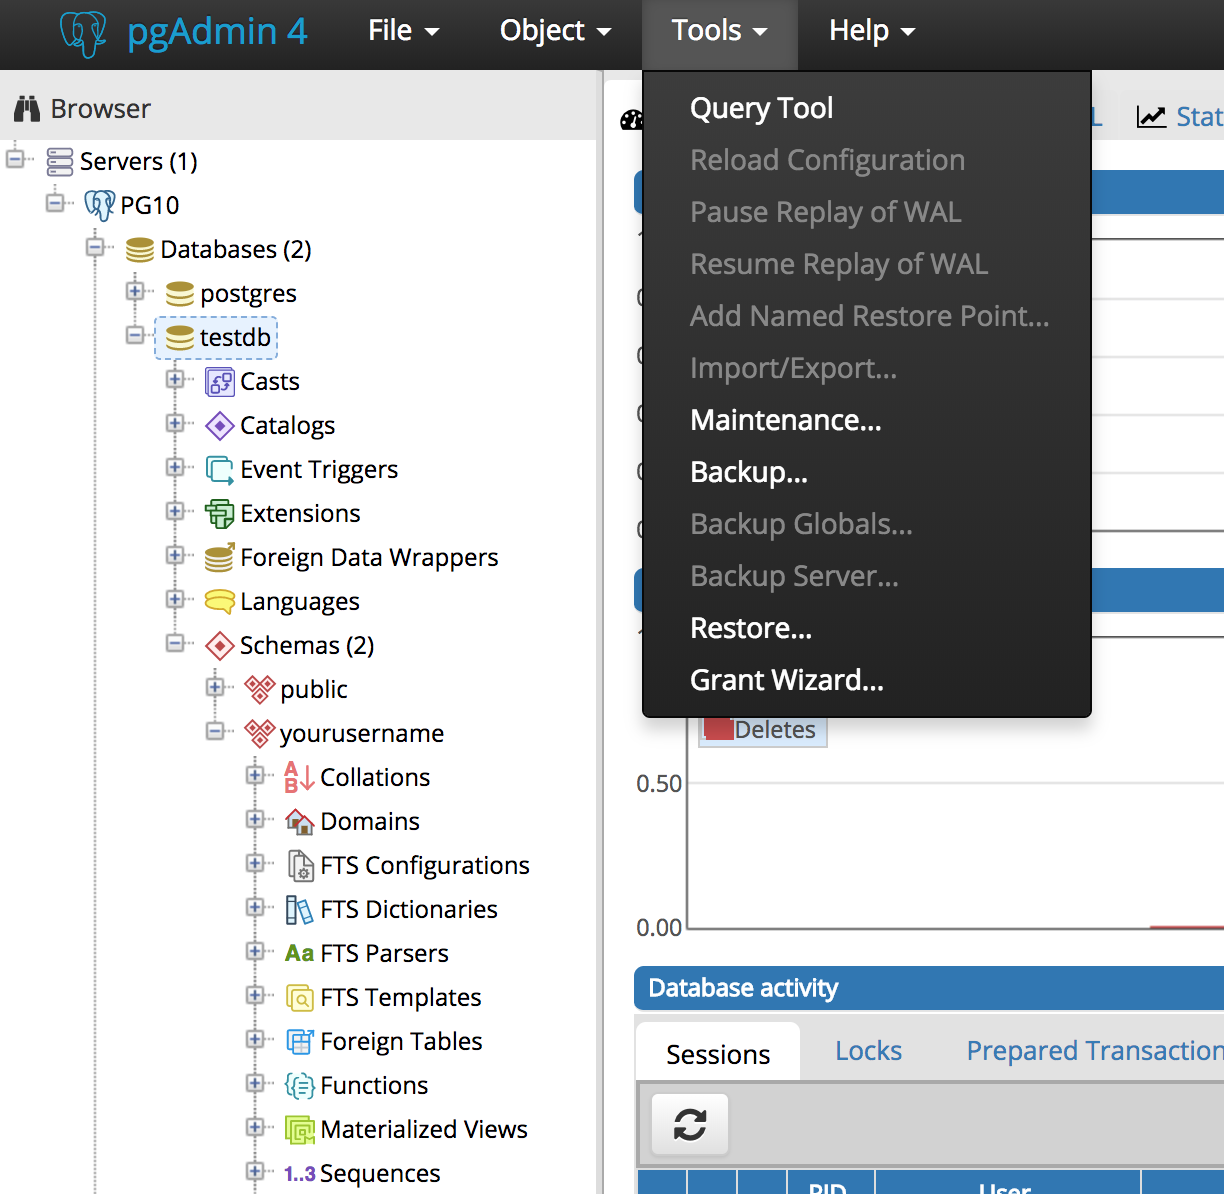 The test table is aptly named "testtable" and you can view all of the data in it by writing a query in one of two ways:
SELECT * FROM testtable;
or
TABLE testtable;
The latter query is a PostgreSQL shortcut for returning all rows in a table. What results do we get?
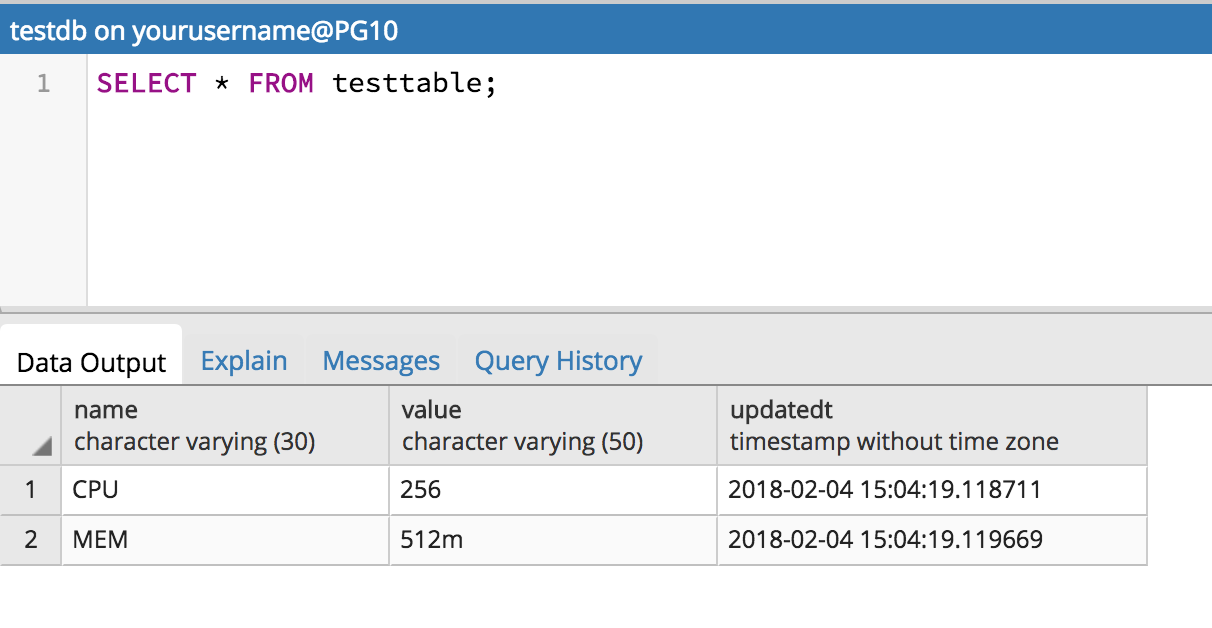 Excellent, you are now setup with PostgreSQL 10 and pgAdmin 4!
PART 4: ONGOING MAINTENANCE
Services crash. Computers restart. How do you ensure you still have access to your PostgreSQL 10 and pgAdmin 4 data?
If you want to stop running PostgreSQL 10 and pgAdmin 4, you can use the following command:
docker stop postgres pgadmin4
If you want to start again PostgreSQL 10 and pgAdmin 4 , you can run:
docker start postgres pgadmin4
If you want to remove your PostgreSQL 10 and pgAdmin 4 containers, you first must stop the containers from running and then use the following:
docker rm postgres pgadmin4
After running the previous command, if you wanted to recreate your PostgreSQL 10 and pgAdmin 4 containers, you can do so with the docker run command that was defined earlier in this post. If you reference the volumes that were created available, your previous data will still be available. This is very helpful if you are upgrading your PostgreSQL 10 and pgAdmin 4 images to use newer images.
We hope you enjoy your PostgreSQL 10 and pgAdmin 4 experiences! And if you're interested, you can also easily get set up with running pgAdmin 4 on Kubernetes.